Sunday, February 24, 2013

Non-Lame Playdate - Cooking Club

According to Natalie, it was time for another Non-Lame Playdate and this time, she came to me with ideas to pitch!! Her choices were:

1) Book Club where everyone was to read The Velveteen Rabbit beforehand and come prepared to read their favorite excerpts.
2) Crazy Make Up playdate....self explanatory (and also immediately dismissed by her mother).
3) Cooking Club where everyone brought their favorite recipe and ingredients to prepare their recipe for the group.

After some back and forth discussions on the Book Club vs Cooking Club...she and I settled on the Cooking Club playdate.

Cooking Club Play Date


This activity took a little planning and preparation, but the end results were more than worth the efforts required to make it a successful day.

The Concept:

  • Natalie made invitations a week ahead of time and instructed the girls to bring a recipe to swap and an apron if they had one.
  • Picking the recipe - my goal was for the girls to do the majority of the work and I didn't want it it to be too difficult. I also would advise double checking on any allergies!!
  • We had two friends to participate (this was the perfect number...any more than that and it would have been a bit much to facilitate!!).


Shopping List:

  • Ingredients for the recipe
  • I bought cookie boxes for the girls to take their granola bars home.
  • I bought small photo album for the girls to put their recipes in.
  • Make sure you have enough baking supplies so that each child has their own "station"


No Bake Granola Bars

Yield: 10 Bars

Ingredients:
  • 1/4 cup butter
  • 1/4 cup honey
  • 1/3 cup packed brown sugar
  • 2 cups quick oats (not rolled oats!)
  • 1 cup crispy cereal
  • 1/2 teaspoon vanilla
  • chocolate chips, peanut butter chips, raisins, etc.
Directions:
  • Line a small jelly roll pan with wax paper
  • In a large bowl, stir oats and crispy cereal. Set aside.
  • In a saucepan, melt the butter, honey and brown sugar together over medium heat until it bubbles. Turn down the heat to low and cook for an additional 2 minutes, constantly stirring.
  • Once done, stir in the vanilla.
  • Pour the mixture over the dry ingredients and gently fold until evenly coated.
  • Pour the entire mixture into half the pan, pressing down in between. You want the bars to be about 3/4 inches thick. Make sure sides and top are packed tightly.
  • Sprinkle with choice of chocolate chips, raisins, etc.
  • Cool to room temp before cutting into bars.


I set up their individual cooking stations and got all the ingredients out prior to the girls arriving. I went step by step through the recipe (my Mom would be proud as there were a few opportunities for math lessons as the girls were measuring their ingredients - fun AND educational!!).

The only part of the recipe that I had to do was the stove top part (I had three sauce pans going at once!!). I also poured the melted mixture into the dry ingredients for the girls.
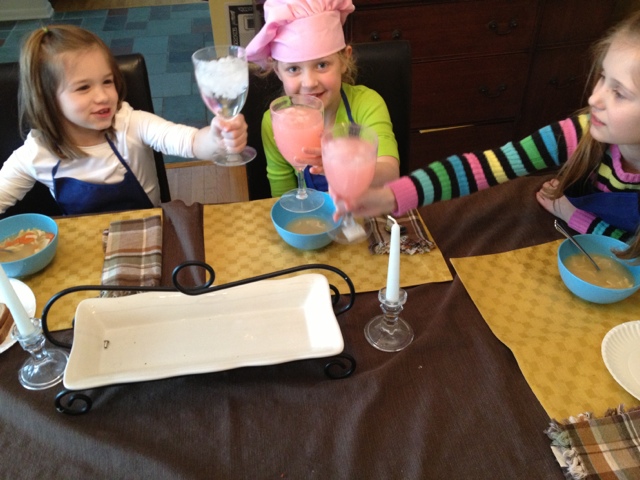


While the granola bars were cooling, I had the girls sit down for lunch where they toasted their culinary achievements and they shared the recipes that they brought. One girl brought her great grandmother's recipe for peanut butter pie and they talked about how special that person was to her Mom - it was such a sweet conversation!


After lunch, the girls were able to decorate their recipe book covers to make them as individual as they are!

It was finally time for dessert and to test the fruits of their labor and the little chefs just raved over their results (I tried some too and have to say it was really yummy!!). Some of the granola didn't stick together, but I put that in zip lock bags for them to add to ice cream or yogurt.


As the girls went off to play before being picked up, I cut the bars up and put them in the cookie boxes (separating the layers with parchment paper).


I attempted to add dishwashing to the list of the day's activities, but it was voted down. :O) However, the girls had such a good time that even facing the dish pile at the end of the event was worth it!!!


Sunday, February 10, 2013

Valentine's Day Box from a Gift Bag!!


Valentine's Day is coming to your child's classroom this week!! Many of you will get the note from the teacher that your child needs to bring in a decorated box to hold those all those notes. My daughter and I were working on hers tonight and I realized that I didn't have any tissue paper to wrap it in, so I started searching frantically for a replacement that wouldn't scream - I AM THE CHILD OF AN UNPREPARED MOTHER!!

Here is what I found - a gift bag!!!!


So once you find your gift bag (you all know you have that stash of gift bags waiting for the appropriate re-bagging opportunity!!!!!)....here is what you need to do.

1) Cut the bag up. Use the sides of the bag for the sides of the box and the face of the bag for the lid. I also split the flower design for 2 of the sides.


2.) Trace the sides and top of the box for an exact fit. Then glue those onto the box. I just used craft glue but used a quick-dry adhesive for the edges. 


3.) To hide the seams, I used the ribbon from the bag.


4) All ready for your child's unique flare - stickers, glitter, foam art...whatever!!


5.) The finished product!!!


Wednesday, February 6, 2013

Dessert under 200 calories: Chocolate-Coffee Parfait

Chobani just introduced Chobani Bites - they are 100 calories each and make a fabulous snack or dessert!!  I decided to try the Coffee with Chocolate Chips and make a dessert out of it.


Other flavors of Chobani Bites include Fig with orange zest, Carmel with pineapple and Raspberry with dark chocolate chips.


Chocolate-Coffee Parfait
Ingredients:
  • 1 Chobani Bites Coffee flavored yogurt
  • 1/2 cup sliced strawberries
  • 1/2 cup blueberries
  • 2 tbsp Cool Whip Lite 
  • Drizzle of Sugar Free Chocolate Syrup
Preparation:
Layer the ingredients in a cup or bowl - top with some Sugar Free Chocolate Syrup and ENJOY!!

Nutritional Information: Calories 196, Fat 2g, Protein 11g, Fiber 5g


Thursday, January 31, 2013

My Super Yummy and Super Healthy Superbowl Menu!

Chicken wings...pizza...chili...chips...dip. Typical Superbowl menu - but I really want to NOT have the junk food hangover come Monday!! So, I've been on a quest redo my Super Bowl menu - recipes need to be easy ingredients, easy to make and most importantly - yummy!

Here are my planned substitutions:

Instead of Chips and Dip....Zucchini Chips and Skinny Ranch Dip


Zucchini Chips (Recipe from BestLife.com)
Makes - 4 Servings

Ingredients:
  • 2 large zucchini
  • 1 tablespoon olive oil
  • 1/4 teaspoon salt
  • 1/4 teaspoon garlic powder (optional)

Preparation:
1. Preheat the oven to 400 degrees F. Coat 2 baking sheets with cooking spray.
2. Thinly slice the zucchini on the diagonal, about 1/8″ thick. Place the slices in a large bowl and toss well with the oil, salt, and garlic powder (if using).
3. Arrange in a single layer on the baking sheets.
4. Bake, turning often, for 25 minutes. Reduce the oven temperature to 300 degrees F and bake until splotchy brown and crisp, 10 to 15 minutes.

Nutritional Information per serving: Calories - 56. Fat-  3.5g,  Protein - 2g, Fiber - 2g, Carb - 6g.

Skinny Ranch Dip (Recipe on skinnytaste.com)
Makes 2 servings

Ingredients: 
  • 2 tbsp light mayonnaise
  • 2 tbsp fat free plain Greek yogurt
  • 2 tbsp fresh chopped scallion
  • salt and fresh pepper
Combine all ingredients in a small bowl and serve. Keeps refrigerated for about 2 days.
Nutritional Information per serving: Calories - 41.3 Fat-  4g,  Protein - 0.8g, Fiber - 0.2g, Carb - 1.7g.


Instead of Beef Chili....Crockpot 3 Bean Turkey Chili

Crock Pot 3 Bean Turkey Chili (Recipe on skinnytaste.com)
Makes 12 servings (10.8oz serving)

 Ingredients: 

  • 1.3 lb (20 oz) fat free ground turkey breast
  • 1 small onion, chopped
  • 1 (28 oz) can diced tomatoes
  • 1 (16 oz) can tomato sauce
  • 1 (4.5 oz) can chopped chilies, drained
  • 1 (15 oz) can chickpeas, undrained
  • 1 (15.5 oz) can black beans, undrained
  • 1 (15.5 oz) can small red beans, undrained
  • 2 tbsp chili powder
For the Topping:
  • 1/2 cup chopped red onion
  • 1/2 cup chopped fresh cilantro for topping
  • shredded cheddar to top (extra pts)
Preparations:
1. Brown turkey and onion in a medium skillet over medium high heat until cooked through.
2. Drain any fat remaining and transfer to crock pot. Add the beans, chilies, chickpeas, tomatoes, tomato sauce and chili powder mixing well.
3. Cook on high 6-8 hours.
4. Garnish with onions, cilantro and cheese and enjoy!

Nutritional Information per serving: Calories - 206.3 Fat-  1.4g,  Protein - 16.8g, Fiber - 9g, Carb - 31.8g.

Instead of Chicken Wings....Spicy Buffalo Cauliflower Bites

Spicy Buffalo Cauliflower Bites (Recipe from skinnytaste.com)
 Makes - 6 servings (1 serving is about 1 cup of cauliflower)

Ingredients:

  • 1 cup water
  • 1 cup all purpose flour
  • 2 tsp garlic powder
  • 22 oz (6 1/2 cups) cauliflower florets
  • 3/4 cup Franks Hot Sauce
  • 1 tbsp melted unsalted butter
Preparation:

1.  Preheat the oven to 450°F. Lightly spray a large non-stick baking sheet with oil.

2. Combine the water, flour, and garlic powder in a bowl and stir until well combined.

3. Coat the cauliflower pieces with the flour mixture and place on the baking sheet; bake for 20 minutes.

4. While the cauliflower is baking, combine the hot sauce and butter in a small bowl.

5. Pour the hot sauce mixture over the baked cauliflower and continue baking for an additional 5 minutes. Serve with skinny blue cheese dressing if desired and celery sticks.

Nutritional Information per serving: Calories - 119.4. Fat-  2g,  Protein - 4g, Fiber - 3g, Carb - 21.4g.


Instead of  Pizza....Quinoa Pizza Bites


Quinoa Pizza Bites
Makes ~40 bites
  • 2 cups cooked quinoa
  • 2 large eggs
  • 1 cup chopped onion
  • 1 cup shredded mozzarella cheese
  • 2 tsp minced garlic
  • 1/2 cup fresh basil, chopped
  • 1 cup chopped pepperoni slices (~1/2 of a 7 oz bag) 
  • 1/2 tsp seasoning salt
  • 1 tsp paprika
  • 1 tsp dried crushed oregano
  • pizza sauce for dipping
1.  Preheat oven to 350 degrees.
2.  Mix together all ingredients, except pizza sauce, in a medium mixing bowl.
3.  Distribute mixture into a greased mini muffin tin, filling each cup to the top (1 heaping Tbs each), and press down gently to compact. 
4.  Bake for 15-20 minutes.

Nutritional Information for 5 bites per My Fitness Pal: Calories - 175, Fat - 10g, Protein - 9g, Fiber - 2g, Calcium - 10mg, Carbs - 12g

So what would you save if you made these changes?????? 


  •  11 Lays Potato Chips = 160 calories, 10 grams of fat vs Zucchini Chips = 56 calories, 3.5g fat
  • 2 tbsp Helluva Good French Onion Dip = 50 calories, 5g fat vs Skinny Ranch = 41 calories, 4g fat
  • Wegman's Chili (10oz)= 351 calories, 13g fat vs 3 Bean Turkey Chili = 206 calories, 1.4g fat
  • 3 Hooter's Chicken Wings = 520 calories, 38g fat vs Spicy Cauliflower Bites = 119 calories 2g fat
  • 1 slice Papa John's  Pepperoni Pizza = 330 calories, 14 g fat vs 5 Quinoa Bites = 175 calories, 10g fat
Traditional Super Bowl Menu = 1,411 calories and 80g fat
Substituted Healthy (but still yummy) Menu: 597 calories and 20.9g fat
Total Calories saved = 814 calories and 59.1g fat


Monday, January 7, 2013

Winter Survival Activity: Sock Puppets

So the holiday rush is over....we made it! Congrats!!!

Now that leaves about 3 looooooong months of cold weather, snow and lots of time indoors with children. That is potentially a recipe for losing your mind as a parent (ongoing chorus of "I'm bored!", bickering siblings, too much TV...)

So, I've decided to find activities to do with the kids that look fun and then rank it based on success of the activity with the kids, amount of prep required, level of mess, level of hands on Mom, etc.

This first activity was making Sock Puppets and Puppet Show.

Ratings:
Overall Score - Would definitely do again
Cost of Materials - about $20
Prep Time - Virtually None
Level of Mess - Some Mess
Level of Hands on Mom - Pretty High
Kids Engagment Level - Pretty High


Part One: Make the Sock Puppets:

I bought this sock puppet kit at Joanne Fabrics from Creativity for Little Kids. So, there was no prep involved (with a coupon, I got 2 kits for $11 each - it made 6 sock puppets). If you have your own sock puppet materials, you can probably get this to be cheaper (I also have materials left over so we can do this again, which would further reduce the cost).


My 7 year old was able to do this on her own, but she flew through the craft portion in about 10 minutes. My two 4 year olds needed me to work with them on their puppets, but they really loved figuring out how they wanted their puppets to look and they picked out all the decorations for their puppets. However, I did have one minor temper tantrum when I placed a felt decoration in the wrong spot and found that the adhesive was pretty strong...it was there to stay, not to the liking of my son!!!


It took about an 50 minutes to make the sock puppets for the younger two (I sent one to play while I worked with the other one, so it was more like 20-25 minutes per pre-schooler).


They puppets came out cute but there was a little clean up involved with all the adhesive backings. I had to do a quick vacuum - but not too bad.


 Part Two: The Puppet Show

We just got an air popper machine for Christmas so I made a big bowl of popcorn for a snack (the kids love watching the popcorn pop!). Then I made a make-shift stage with two chairs and a blanket. Each child was given 5 minutes to perform a "show" with their puppets while the rest of us watched. One show included all the kids and their puppets and that turned into a minor meltdown - highly recommend the solo performance unless your children just LOVE to share the stage together!!


Overall, a good activity for today! If you have any tried and true indoor activities for your kids, I'd love to hear them!!!!


Saturday, December 29, 2012

Crockpot Comfort: Hamburger Soup

I love EASY crockpot recipes for picky eaters on cold winter days...here is one of my favorites!!!


Hamburger Soup


  • 1 lb ground turkey or 95% lean ground beef
  • 1 tbsp olive oil
  • 1 can of corn 
  • 1 can of diced tomatoes
  • 1 can condensed tomato soup, plus 1.5 cans water
  • 1 can beef broth (or 1 beef bullion cube dissolved in 2 cups boiling water)
  • 1 small onion diced (my kids don't like onions so I used some onion salt for taste)
  • 1 tsp minced garlic
  • 2 cups wagon wheel pasta (measured dry)
- Brown the ground beef in some olive oil, onions and garlic until meat is no longer pink.
- Combine remaining ingredients into the crockpot (you might choose to wait on adding the pasta until later so it doesn't get mushy). 
- Let it cook in the crockpot until ready to enjoy!! 
- My kids love to sprinkle some grated Parmesan cheese on top and some Italian Bread on the side. 


Tuesday, December 11, 2012

Elf on the Shelf: 23 Days of Jingle "fun"!

Starting last year, I saw posts from friends on Facebook where they hiding some kind of Elf toy from their children and I have to admit that I just didn't "get it". Then it started again this year (and it is ALL over Pinterest!). So, I gave in to the peer pressure and looked into it...on December 1st, we adopted our own Elf on the Shelf - Jingle Charity (because I needed one more thing to add to my holiday to-do list!!!)

Instead of posting this on Facebook, I thought I would keep this blog updated with Jingle's adventure in our rookie year of Elf on the Shelf:

December 1st: Round Table

Jingle's first order of business was to meet with each of the kids favorite stuffed animal over tea to get the "low down" on their behavior this past year.


December 2nd: Traffic Jam

I was attempting to remind the kids of the traffic backups we encounter in our morning commute when they dawdle getting ready in the morning! (Note: unfortunately, this has minimal impact on our morning chaos!)


December 3rd: Read! 

Although I did want to remind Natalie that she needs to read each night....I will admit that I was on my way up to bed when I remembered that I needed to move Jingle and I had not one creative cell left in my body at the moment.


December 4th: Eat Your Dinner!

The kids had been not so great with table manners and finishing their veggies. Although I thought this one was good...it was not such a great hit with the kids (not too fun, apparently plus Jingle tipped over and appeared to be in a food induced coma when they found her!).


December 5th: Study Hard!! 

Just a little reminder to Natalie to stay focused in school and study her spelling words!


December 6th: Jingle Fairy

Natalie lost ANOTHER tooth at school unexpectedly so I had Jingle take on some Tooth Fairy duties (Note: I don't usually give $5 for a lost tooth, but we didn't see this one coming and of course, that is the smallest bill I had in my wallet - thank goodness Jingle Fairy is on temporary assignment!).


December 7th: All Aboard!

I finally got the stockings up and so I had Jingle help me celebrate my Holiday decor productivity...also, it was a Friday night that I got home late after a stressful week and had to get up early the next day...it was not my most creative, but it was the best I could muster!


December 8th: Happy Hanukkah! 

The kids had been learning about Hanukkah at school and also came home with their own Dreidels...so this is Jingle saying Shalom!


December 9th: Jingle is Getting the Band Back Together!

My kids (especially Drew) LOVE music and playing instruments, giving shows, singing, etc. I was trying to make up for some of my less than stellar Jingle adventures and decided that creating a full band might just do the trick.


December 10th: Getting into the Swing of Things! 

I fully admit that this night I fell asleep on the couch....no "Creative Mother of the Year" awards will be granted for this one. But at least I remembered to move her!!!


December 11th: The Great Outdoors

Natalie started Brownies this year so I thought that Jingle could do a little camp out in the wild with her forest friends. (OK...I was also REALLY trying to make up for the previous night's sub-par showing!)


December 12th: And the Joker Got Away!

Jingle is in trouble!!! Good thing that all these Super Heroes live in our house to save her! Maybe after the rescue they can dust off the top of my fridge...yikes!


December 13th: Waiting for the gifts!

Doug had to fill in for me this night so this is his first attempt at Jingle's adventures....


December 14th: Friday Night Featured Flick!

Jingle enjoyed a nice relaxing evening catching up on some classic Christmas movies...


December 15th: Chef Jingle

We had a holiday party tonight and Doug left for a trip to NH...another "not so great, but it is all I can do" Elf on the Shelf night! I didn't even have the motivation to take the picture until the next morning!


December 16th: Private Eyes....Are Watching You! 

Not easy to get a picture of this one,but I thought the kids needed a little challenge in finding Jingle!!


December 17th: Wrapping the Night Away! 

I've sorted all our gifts into "Santa Gifts" and "Mom and Dad" gifts...but have not wrapped even ONE!!! If only Jingle's magic could wrap all my gifts over night, what a Christmas Miracle that would be!!


December 18th: Holiday Photo Opportunity! 


As an after thought...I should have propped another snowman taking their picture or figured out how to make Jingle take the Snowmen's family portrait...darn that morning after brilliant idea!!!!!! I'll have to file that one for next year!


December 19th: Words with Friends (Old School Style!)

Our kids love playing board games - so I thought Jingle going head to head with our Tree Angel would be fun. It helps having one child that reads so they truly appreciate the time I put into making it a holiday theme!


December 20th: MIA

My husband and I spent the night in the ER with one of our boys, after getting home at 3am....we moved Jingle to the Christmas tree but taking her picture wasn't exactly a priority!!


December 21st: Jingle Fever


My daughter came down with a fever, congestion, cough... (when it rains, it pours in this house!!!). Jingle came down with something similar to help Natalie feel better!! We asked Jingle to take Natalie's sickness back to the North Pole with her so that we could join our family for Christmas - it was our plea for a Christmas Miracle!


December 22nd: Jingle Plum Fairy

Only 3 days left for Jingle Adventures!!!! I think this one is my favorite....I took Natalie to see The Nutcracker last year and she loved it. I knew that she would appreciate seeing Jingle in her favorite holiday ballet! Now if I could figure out how to stage Jingle in White Christmas...hmmmmm.....


December 23rd: Zip Line with Jeremy

We got to the Christmas House that my family rents in the Catskills and there was another Elf on the Shelf named Jeremy!!! Jeremy and Jingle spent their final adventure zip lining on the stocking line!