Showing posts with label cookies. Show all posts

Tuesday, June 17, 2014

Pinterest Review: Lego Cookies


We went to an outdoor movie night this past weekend to see The Lego Movie so I thought I would try out a version of the Lego cookies I've seen all over Pinterest with the goal of making the cookies in the simplest way possible.


Step One:  Ingredients - very simple!

 Step Two: Sort the M&Ms and color the frosting


 Step Three: Roll out the dough on wax paper with a rolling pin and some flour. Then I used a pizza cutter to cut out the different sized lego cookies.


Step Four: Place the lego cookies on an ungreased baking sheet. Bake at 350 for about 10 minutes because they are so small. Let them cool on a cookie rack for about 10 minutes.

Step Five: It's all fun and games until you have to frost them!!! These are tiny cookies and tiny M&M's...it took over an hour to frost and place the M&M's on the cookies. (Make sure you place the M&M pieces with the "M" face down - just an aesthetic thing!).

Step 6: Once frosted, I put the cookies into two Lego bin lids - I thought it was a cute way to present them!


My overall review of Lego Cookies: 

These are really cute and the perfect size for kids because they are small cookies. It was just the frosting process that was the real time consumer (although if you made your dough and your own frosting then you are definitely making a real project for yourself!!!).  My kids like helping me sort the M&M's and they were really excited to bring these to the movie!

Saturday, March 22, 2014

Apple Crumble Bars

I made this recipe from items I had on hand in my pantry!!! Super easy and super yummy!


Apple Crumble Bars

Ingredients: 
Sugar Cookie Mix
1 Egg
1 Stick of butter
1 Can Apple Pie Filling (21 oz)
Topping:
3/4 cup Quick Oats
1/2 cup cold butter or margarine
3/4 cup all purpose flour 
3/4 cup Brown Sugar 
1 tsp Ground Cinnamon 
Directions:
Make the Sugar Cookie dough as directed 
Spray a 9x13 pan with cooking spray
Press the cookie dough into the base of the pan
Spread the apple pie filling onto the cookie dough 
In a separate bowl, mix the ingredients for the crumble topping. Use a fork to get it all blended together. 
Spread crumble topping onto the apples and coat evenly.
Bake in the oven at 375 for 25-30 minutes until the dough is cooked and the topping is bubbling. 
Let cool completely before cutting into squares. 

Sunday, February 24, 2013

Non-Lame Playdate - Cooking Club

According to Natalie, it was time for another Non-Lame Playdate and this time, she came to me with ideas to pitch!! Her choices were:

1) Book Club where everyone was to read The Velveteen Rabbit beforehand and come prepared to read their favorite excerpts.
2) Crazy Make Up playdate....self explanatory (and also immediately dismissed by her mother).
3) Cooking Club where everyone brought their favorite recipe and ingredients to prepare their recipe for the group.

After some back and forth discussions on the Book Club vs Cooking Club...she and I settled on the Cooking Club playdate.

Cooking Club Play Date


This activity took a little planning and preparation, but the end results were more than worth the efforts required to make it a successful day.

The Concept:

  • Natalie made invitations a week ahead of time and instructed the girls to bring a recipe to swap and an apron if they had one.
  • Picking the recipe - my goal was for the girls to do the majority of the work and I didn't want it it to be too difficult. I also would advise double checking on any allergies!!
  • We had two friends to participate (this was the perfect number...any more than that and it would have been a bit much to facilitate!!).


Shopping List:

  • Ingredients for the recipe
  • I bought cookie boxes for the girls to take their granola bars home.
  • I bought small photo album for the girls to put their recipes in.
  • Make sure you have enough baking supplies so that each child has their own "station"


No Bake Granola Bars

Yield: 10 Bars

Ingredients:
  • 1/4 cup butter
  • 1/4 cup honey
  • 1/3 cup packed brown sugar
  • 2 cups quick oats (not rolled oats!)
  • 1 cup crispy cereal
  • 1/2 teaspoon vanilla
  • chocolate chips, peanut butter chips, raisins, etc.
Directions:
  • Line a small jelly roll pan with wax paper
  • In a large bowl, stir oats and crispy cereal. Set aside.
  • In a saucepan, melt the butter, honey and brown sugar together over medium heat until it bubbles. Turn down the heat to low and cook for an additional 2 minutes, constantly stirring.
  • Once done, stir in the vanilla.
  • Pour the mixture over the dry ingredients and gently fold until evenly coated.
  • Pour the entire mixture into half the pan, pressing down in between. You want the bars to be about 3/4 inches thick. Make sure sides and top are packed tightly.
  • Sprinkle with choice of chocolate chips, raisins, etc.
  • Cool to room temp before cutting into bars.


I set up their individual cooking stations and got all the ingredients out prior to the girls arriving. I went step by step through the recipe (my Mom would be proud as there were a few opportunities for math lessons as the girls were measuring their ingredients - fun AND educational!!).

The only part of the recipe that I had to do was the stove top part (I had three sauce pans going at once!!). I also poured the melted mixture into the dry ingredients for the girls.


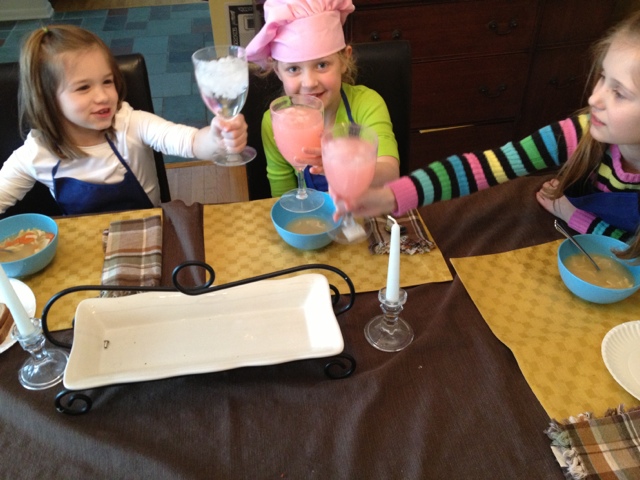
While the granola bars were cooling, I had the girls sit down for lunch where they toasted their culinary achievements and they shared the recipes that they brought. One girl brought her great grandmother's recipe for peanut butter pie and they talked about how special that person was to her Mom - it was such a sweet conversation!


After lunch, the girls were able to decorate their recipe book covers to make them as individual as they are!

It was finally time for dessert and to test the fruits of their labor and the little chefs just raved over their results (I tried some too and have to say it was really yummy!!). Some of the granola didn't stick together, but I put that in zip lock bags for them to add to ice cream or yogurt.


As the girls went off to play before being picked up, I cut the bars up and put them in the cookie boxes (separating the layers with parchment paper).


I attempted to add dishwashing to the list of the day's activities, but it was voted down. :O) However, the girls had such a good time that even facing the dish pile at the end of the event was worth it!!!


Sunday, December 2, 2012

Holiday Traditions: Molasses Press Cookies


I attended a cookie exchange today and needed 4 dozen cookies to share. When I went looking for some cookie cutters, I came across my Mom's cookie stamps.

If you have never seen cookie stamps, they are Terra Cotta stamps that make designs into the dough. As soon as I found the bag of stamps, nostalgia hit me -I fondly remember making Molasses Press Cookies with my Mom every year and thought they would be a perfect choice to share!


I wasn't really sure of the background to these cookie stamps so I did some research today and found that these stamps are traditional to the Pennsylvania Dutch and also the Scandanavians. In the Scandanavian tradition (which I like best), women pass down the stamps from one generation to the next and the stamps are used to make cookies and cakes for friends at Christmas time.


Here is the recipe I found (it made 52 cookies):

  • 1 cup butter
  • 2 cups sugar
  • 2 eggs
  • 1/2 cup molasses
  • 4 cups flour
  • 1/2 tsp salt
  • 1 tsp ground ginger
  • 1 tsp cinnamon
  • 3/4 tsp cloves
In a medium sized bowl, mix the butter and sugar. Next add the eggs and molasses - mix well.

In a seperate bowl, mix the dry ingredients and then add it to the wet ingredients slowly (the dough is pretty thick - I had to take a few breaks!)

Once dough is fully mixed, form the dough into balls (about the size of chestnut). Roll the ball into sugar and place on a cookie sheet.

Press the cookie stamp onto the ball and flatten it.

Bake at 350 degrees for 8-10 minutes.


If you are looking for a new twist on cut outs or just looking for a unique cookie to bake...I highly recommend these! These are also a great gift idea - I found a website that sells these stamps - Rycraft Cookie Stamps. The site also includes recipes for different cookies you can use these stamps with.

My kids LOVED pressing the stamps into the dough and I have to say that in comparison to traditional cut outs, these were alot easier to do!